
Shane Brinkman-Davis Delamore is a master of the craft and passionate about UX design and programmer productivity.
Updated Jun 16, 2020
A lot has been written on the topic of API best practices, especially for the web. In this post we’ve gathered the best principles and resources to guide your next RESTful API project in the right direction.
POST '/api/posts'GET '/api/posts/{post_id}' PUT '/api/posts/{post_id}' DELETE '/api/posts/{post_id}' GET '/api/posts?user_id={user_id}' While REST is the popular current standard, it isn’t the only option. GraphQL is an up-and-coming standard which a lot of good points. One of the main advantages of GraphQL is the ability for the client to control exactly what data is returned from a request. If your client is going to be requesting large or complex data structures, you might look into using GraphQL.
However, for most projects, REST is still an excellent choice. There is a lot of existing tooling available and it naturally integrates with the rest of the web. REST is really just the web protocol (HTTP) minimally adapted for programs rather than humans. GraphQL is really a whole new protocol, even though it is built on top of HTTP.
Just use JSON. Send and receive all your data as JSON and you and your customers will be happy. PUT & POST should accept JSON in the request body. All GET requests should return JSON.
If nothing else, if you follow this section you’ll be in good shape. For almost all applications you really just need the CRUD operations plus queries (create, read, update, delete & queries).
Follow this pattern for each record type you want to make accessible via the API. In this example, the record type is "posts." The record type should be plural.
CRUD:
POST '/api/posts'GET '/api/posts/{post_id}' PUT '/api/posts/{post_id}' DELETE '/api/posts/{post_id}' Queries:
GET '/api/posts' Usually you don’t want all records for given type. Pass query parameters as, well, HTTP query parameters:
GET '/api/posts?user_id={user_id}'Everything you ever wanted to know about REST and HTTP methods: REST – PUT vs POST – REST API Tutorial
If your application needs mutation actions that update more than one record or queries which return more than one record type, you’ll be going off the beaten path; REST doesn’t have clear guidelines for how to proceed.
A word of warning. If you think you need to do something that doesn’t fit in the basic REST CRUD+Query patterns, think very hard about it before proceeding. You really can get a lot done within basic REST, and the better you conform to standard REST, the more client-side apps will work seamlessly with your API. That said, there are often good reasons to add a little extra functionality to an API beyond standard REST. Just be sure to only do it AFTER you already support all the standard REST endpoints that make sense for your application.
If you’ve decided to add some non-standard endpoints, the most important thing is to define a general strategy up front and then stick to it.
Example: One way to define complex end-points is to use a "resource-dash-action" naming scheme:
GET '/api/posts-histogram' POST ‘/api/posts-erase-old' Just remember that GET methods can be cached by the browser. The URL, including query-string, should always return the same results if the source data hasn’t changed. Further, GETs should never, ever mutate your data.
Here are a few quick tips to get you rolling. REST is all about defining your endpoints - the URLs you’ll use to read and modify your data.
/api/posts/api/users/api/comments/api/post/{post_id} for reading one post and /api/posts for reading a set of posts/accounts/{account_id}/memberships/{person_id}/accounts/{account_id}/membershipsGET /comments/{comment_id}POST /commentsPUT /comments/{comment_id}GET /comments/?{query_params}POST /post/{post_id}/commentsGET /post/{post_id}/commentsJSON Web Tokens, or more commonly called JWTs (“jots”) are an open, industry standard method for securely and efficiently tracking sessions. There are great libraries out there for most platforms, and most the time the API client doesn’t need to understand them. The server generates them, returns them to the client, and all the client has to do is pass them back to the server, untouched, on subsequent requests.
If you are using sessions, you simply have to use HTTPS. Sessions are secure only as long as no-one else can copy them. That’s only true if you are using an encrypted end-to-end connection.
If you want your API to get used, it has to be documented and it has to be easy to try out and experiment with. Swagger is a nice answer to all of the above. Swagger is a standard way to document REST APIs in JSON format. Further, Swagger provides an excellent web-interface module you can deploy on your site for both documentation and experimentation purposes. There exists tons of tooling server-side for automatically generating the JSON definitions. There are also client-side libraries which will consume a Swagger JSON definition and generate client-side code for using that API.
You should really use a server-side framework that supports Swagger exports. One of the biggest problems with APIs is maintaining their documentation over time. If your documentation is generated directly from your server’s code, you know it’ll always be up to date.
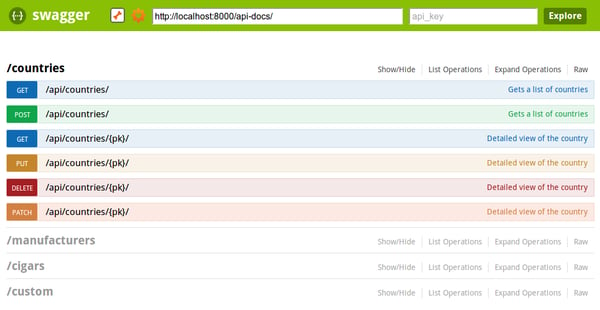 Swagger's automatic documentation & testing interface
There are some great resources for testing REST APIs. One of our favorites is Postman. This tool makes it easy to explore your REST API organically, but since it logs all your calls, it's easy to go back and automate what you did to make tests.
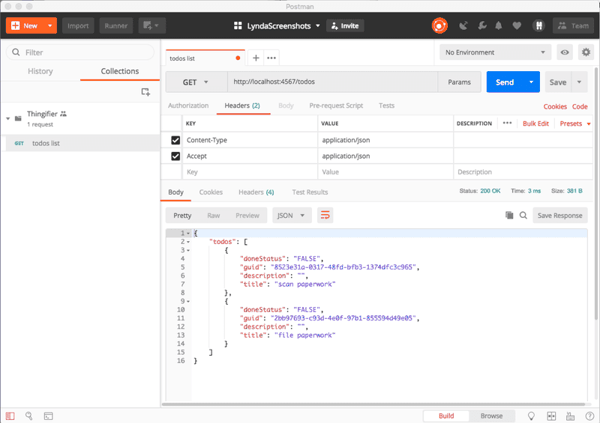
Postman is fully configurable for any type of HTTP request
Often an API lives at the same URL as a human-readable website. In these scenarios, the convention is to put the api at /api/*. Alternatively, if your API is going to live on its own domain, api.myhost.com/* is also a solid option.
A common way to do versioning is to change the API root: /api/v1/* , /api/v2/* etc. The nice thing about this scheme is it’s OK to worry about it later. You can start with /api/* for v2 and later add /api/v2/*
In summary, here’s what you really need to know:
/api/v1/* for your API versioningRecommended further reading: Best Practices for Designing a Pragmatic RESTful API
Can we help you apply these ideas on your project? Send us a message! You'll get to talk with our awesome delivery team on your very first call.
 Github
 LinkedIn